Volume Calculator
This tool allows computation of the volume of liquid injected into cells during an injection, using fluorescent cell images.
Prerequisites
For a full calculation of injected volumes
- an image of the cantilever filled with the fluorescent liquid (taken manually) and
- images of the injected cells, acquired in an observation run
are required and should meet these requirements:
- The injection and observation positions must be grouped in a point group
- All images (including the one of the cantilever) must be made with the same objective, filter and illumination intensity.
Overview
Volume computation is divided into four steps:
out of which Reference Selector and Cell Image Selector must be completed before proceeding to Image Processing.
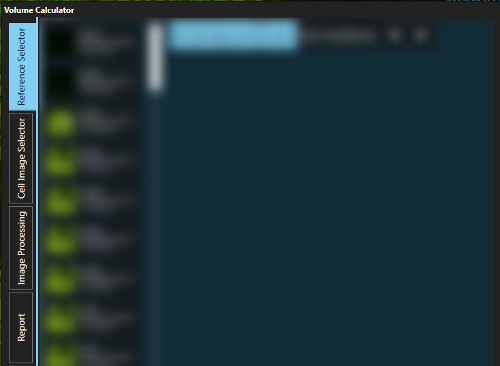
- Volume Estimation Dialog
For every step there is a dedicated tab on the left side of the window that presents additional details. A  will be displayed if it is completed.
The volume computation can be interrupted at any time by closing the tool without losing the progress of the individual steps.
General Handling
Image feature selection is an essential component in the volume estimation process and is required for Reference Selection and Image Processing.
This section describes the available tools.
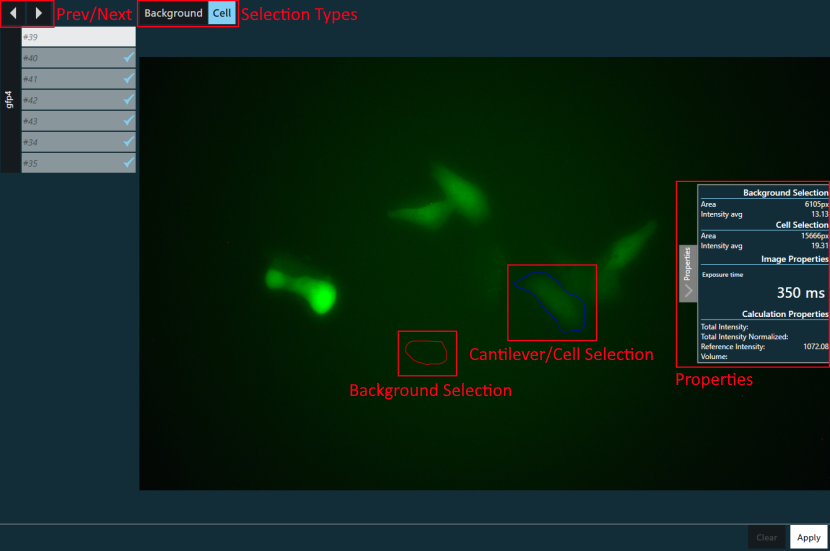
- Selection Tools
Selection Types
The selection type indicates which feature is currently being selected: a part of the background area or the cantilever/cell.
- Making a selection
- Press and hold the left mouse button and outline the feature, then release the mouse button. After the bakground selection has been made, the active selection type automatically switches to cantilever/cell.
- Changing a selection
- The selection of the active type can be reduced by using the right mouse button instead and “cutting off” a part of the selection. Selections are made by holding the left mouse button and marking the selection.
To distinguish the finished selections, the two types are outlined with different colors: blue for cantilever/cells and red for background.
Once both selections are set they need to be applied by pressing the Apply button or the Enter keyboard-key before further computations are made.
Prev/Next
Pressing the left or right-arrow buttons move to the previous or next reference/cell image respectively.
The same action can also be performed using the ← and → keyboard-keys.
Properties
The Properties are located to the right of the image and can be shown or hidden by pressing the  button.
Depending on the context, the following properties may be shown:
| Property | Description |
|---|---|
Area |
The amount of pixels (of the image) contained in the selection |
Intensity avg |
The selection’s average intensity per pixel |
Cantilever angle |
The angle of the cantilever (relative to the X/Y plane) |
Cantilever height |
The height of the cantilever |
Pixel height |
The vertical length captured by a single pixel of the image |
Pixel width |
The horizontal length captured by a single pixel of the image |
Exposure time |
The exposure time used when taking the image |
Fl per pixel |
The volume of the cantilever contained captured by a single pixel of the image. This is calculated using the fl per px equation. |
Total Intensity |
The total intensity of the cantilever/cell selection with the background intensity subtracted |
Total Intensity Normalized |
The Total Intensity normalized according to the exposure |
Reference Intensity |
The intensity corresponding to one fl |
Volume |
The computed injection volume in fl |
Note
Exposure time and Fl per pixel are calculated automatically from the images’ meta data.
If the required meta data is not present the values must be entered manually by pressing the respective value.
Manually entered values take precedence over values calculated from meta data.
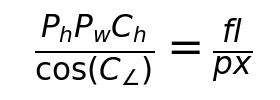
- Equation for calculating fl per px Ph =
Pixel height[µm] Pw =Pixel width[µm] Ch =Cantilever height[µm] C∠ =Cantilever angle
Reference Selector Tab
Here a cantilever is chosen from the reference image list to calculate the Reference Intensity later used for volume calculations.
After choosing the reference image from the list, select a background and cantilever area as described in Selection Types.
If the Exposure time or fl per pixel properties are not set automatically (grayed out) they need to be set by accessing them in the properties table located on the right.
When the selection is completed it must be applied by pressing the Apply Reference or the Enter keyboard-key.
To change a already applied selection press the Clear Reference button.
The tab is considered complete when a selection is successfully applied.
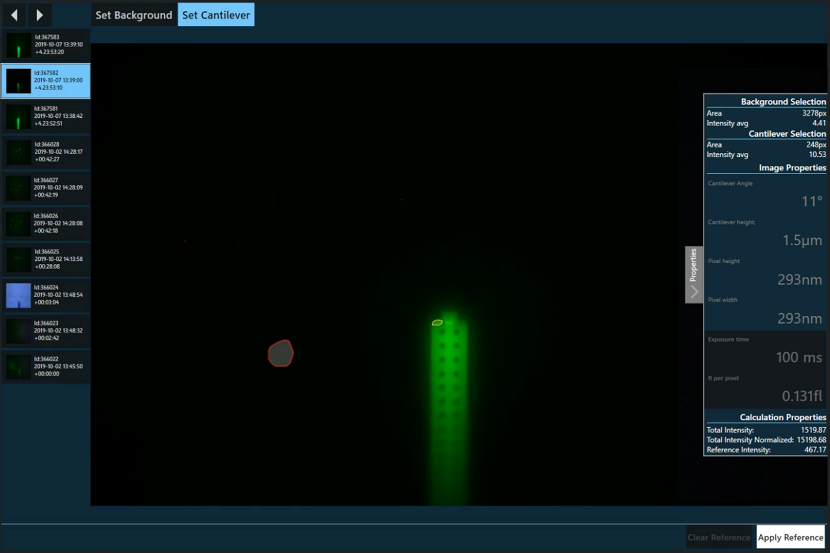
- Reference selector tab
Warning Messages
When trying to apply the selected reference image warnings may be shown that prevent the reference image and the selections from being accepted:
| Warning | Reason | Solution |
|---|---|---|
| Selection intensities | The background selection has a higher average intensity than the cantilever selection. This usually indicates that background and cantilever selections are interchanged. | Review background and cantilever selections. |
| Mismatching pixel size | The selected cell images and the reference image don’t have the same pixel sizes, typically because a different objective was used. A list showing the pixel sizes can be shown by pressing the  button. button. |
Either choose a new reference image or change the cell image selection. |
| Exposure time not set | The Exposure time is not available in the image’s meta data or has been set to 0. |
Set the Exposure time either by pressing the Set exposure button inside the warning or the Exposure time value in the properties. |
| Volume per pixel not set | The Fl per pixel value could not be calculated because of missing image meta data or has been set to 0. |
Set the Fl per pixel either by pressing the Set volume per pixel button inside the warning or the Fl per pixel value in the properties. |
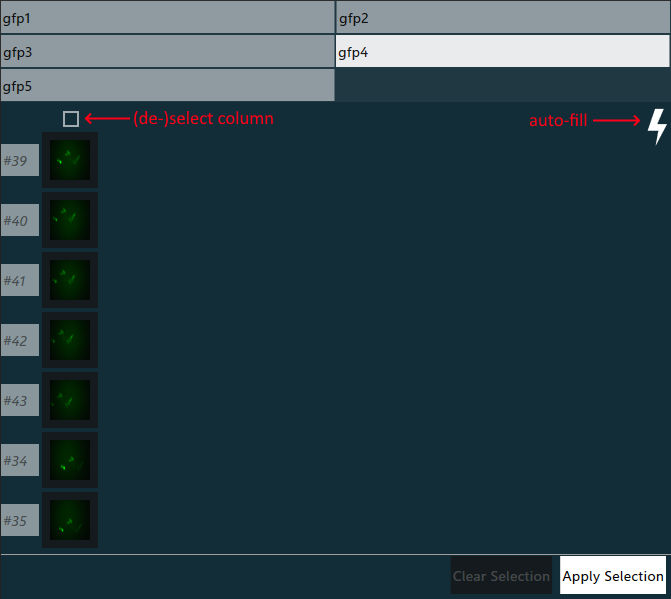
Cell Image Selector Tab
The Cell Image Selector tab is used to select the cell images that are to be processed.
At the top of the window a list of all point groups can be found. When a point group is selected, all contained points and associated images are displayed in a grid with each row representing a point.
Each image can be (de-)selected by pressing it. Once a complete selection has been made it can be applied by pressing the Set Selection button.
Once the selection has been applied it must be cleared by pressing the Clear Selection button before a new selection can be made.
Pressing the auto-fill button will take the first two selections made on the first row and select every nth columns following the two selections. n is the distance between the two selections. This is usefull when performing timelapse analysis.
The tab is considered complete once a selection has been applied.
Note
Selecting multiple images per point group will enable time-lapse analysis.
Warning
Clearing a selection also discards all background and cell selections already made in image processing and therefore all volume computations.
- Cell image selector tab
Warning Messages
When trying to set the selected images, warnings may be shown that prevents the selection from completing.
| Warning | Reason | Solution |
|---|---|---|
| Non-uniform grid | In the selected point group, the points are associated with varying number of images. | None (image selection can continue) |
| Mismatching pixel size in selection | The selected images have different pixel sizes, typically because different objectives were used. A list showing the pixel size for each image can be shown by pressing the button. |
Select only images with matching pixel sizes. |
| Mismatching pixel size | The selected cell images and the reference image don’t have the same pixel sizes, typically because a different objective was used. A list showing the pixel sizes can be shown by pressing the button. |
Either choose a new reference image or change the cell image selection. |
| Mismatching exposure times | The selected images have different Exposure times. A list showing the Exposure time for each image can be shown by pressing button. |
None (intensity calculation is normalized) |
| Missing exposure times | Some of the selected images are missing Exposure time meta data. |
Set a Fallback exposure time by pressing the Set fallback exposure button inside the warning. |
Note
The Fallback exposure time is applied to all selected images with missing Exposure time. Images with Exposure time set from meta data will retain their respective values.
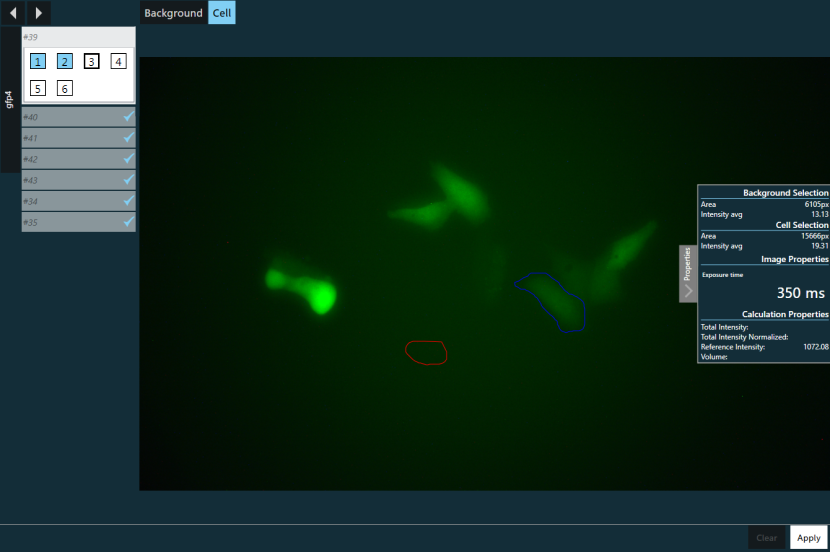
Image Processing Tab
The image processing tab is used to perform the background and cell selection for each image.
The list on the left side contains the points selected in the Cell Image Selector Tab. Select a point to display the image chosen for volume calculation for this point, then select background an cell areas as described described in Selection Types.
If multiple images are selected per point they are displayed in a list below the point when selected. When a image has been processed it’s background will change from white to blue. When applying a selection it’s outline will be applied to the next image of the point if present. Once all images for a point are processed a will appear next to the point’s name.
If more than just the selected image are associated with a point, these other images can be overlaid on the selected image by accessing the Overlays at the top of the window and pressing the image. The opacity of the overlaid image can be controlled with the slider in the top right corner of the window. This may be helpful for cross-checking the cell selection with different image recording configurations where cell boundaries may easier to see.
Once the background and cell selections are complete confirm the selection by pressing the Apply button (or the Enter keyboard-key). This triggers computation of the volume and the corresponding point is marked as completed with a next to the point in the list.
The tab is considered complete once all the images have been processed.
- Image processing tab
Warning Messages
When trying to apply the selected selections, warnings may be shown that prevents the selections from being applied.
| Warning | Reason | Solution |
|---|---|---|
| Selection intensities | The background selection has a higher average intensity then the cell selection. This usually indicates that the background and cell selections are interchanged. | Review background and cell selections. |
| Exposure time not set | Exposure time has been set to 0. |
Set the Exposure time in the Properties. |
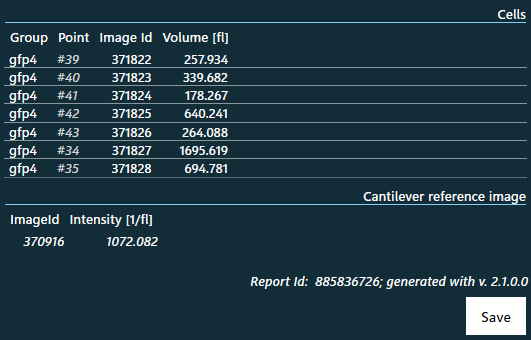
Report Tab
This tab displays the computation results available so far (even if not all images have been processed).
Whenever the volume is computed for one of the points in Image Processing an entry is added to the report containing:
- The point group which contains the point
- The point number and name (if any)
- The Id of the image used for volume computation
- The computed volume in fl
- Report tab
Note
When displaying time-lapse data the following applies:
- The Id of the image is not displayed
- The volume results are grouped per point and displayed in multiple columns.
- If the columns exceed the space available to be displayed they are hidden and the data must be exported to access the complate data set.
The Image Id can be used to identify the image in the Result history (extended column view) or to find the image after it is exported.
The report also contains information about the used cantilever reference:
- The Id of the reference image
- The calculated
Reference Intensity
The Save button adds a snapshot of the current report to the Result history. The same snapshot can only be added once. Save is re-enabled once new volumes are added to the report.
After saving the tab is considered complete.