Select Positions
As a first step of many workflows is to select the positions where further actions are to be performed.
This step has different modes which allow you to select positions in various ways. Some modes may not be available for all workflows, because they are not useful in the respective context.
Single position mode 
Drag the crosshair on the interactive sample display to select a single position for the subsequent workflow step.
Multiple positions mode 
Drag the crosshair on the interactive sample display to select multiple positions for the subsequent workflow step.
Press the Add Point button to add the position at the center of the crosshair to the selection.
This will also add a preview dot on the interactive sample display which can be highlighted when the corresponding entry in the list is selected.
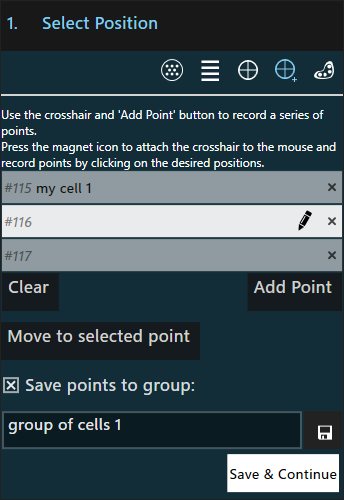
Each selected position will automatically be given a number which is unique within the active experiment.
You can give each position a name (or short description) using the  button.
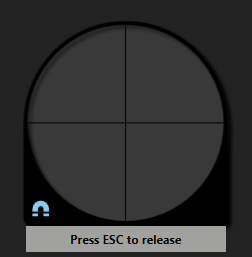
To accelerate selecting positions, press the  icon on the crosshair.
The crosshair then immediately follows mouse movements and you can select positions with a left mouse click.
Press the
icon on the crosshair.
The crosshair then immediately follows mouse movements and you can select positions with a left mouse click.
Press the Esc key on the keyboard to release the crosshair.
A selected position can be brought back into the center of the view at any time by selecting it in the list and pressing the Move to selected point button (unless the point is located in a different well than the probe currently is).
Danger
The probe will not be retracted during such a movement. Hence, there is a risk that the probe crashes when moving to a point far away and the surface is uneven or tilted!
Note
Positions will be processed in the order in which they are added to the selection.
Saving a group
You can optionally save the selected positions to a group by enabling the corresponding option and specifying a unique group name.
The group can either be saved using the Save & Continue button, which immediately continues to the next action
or by using the  button, which will allow you to select more positions (and possibly
save more groups).
Pressing the latter automatically switches to the groups mode with the saved group pre-selected.
button, which will allow you to select more positions (and possibly
save more groups).
Pressing the latter automatically switches to the groups mode with the saved group pre-selected.
Groups mode 
Use the positions from one or more groups of previously selected points (see also Review Positions for how to save points to groups).
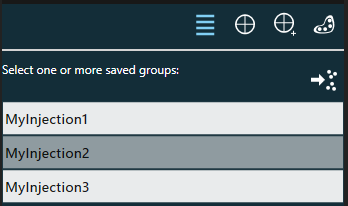
The points within the selected groups can be reviewed by pressing the  button.
This also gives you the chance to edit the list of points before continuing the workflow:
pressing the
button.
This also gives you the chance to edit the list of points before continuing the workflow:
pressing the Edit button will switch the selection mode to the multiple positions mode
pre-populated with all points from the selected groups.
Points can then be added or removed from this list as described above.
Note
Editing the list of points does not change any of the previously saved point groups, it only affects the positions that will be processed in the next step.
However, the modified list can be saved as a new group.
“Lasso” mode 
Draw an arbitrary shape on the interactive sample display - the resulting area will be uniformly filled with positions.
“Points” mode 
Choose one or more predefined points (see plate model) in a well.
Recovery mode 
This option recovers previously selected positions and may contain two sets of positions:
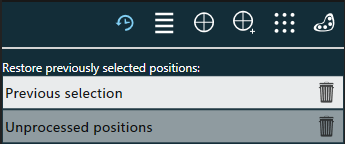
- Previous selection: Positions that were previously selected (in a ‘Select Positions’ step) but on which no action (e.g. injection) was performed. This may either be because the position selection was intentionally or unintentionally interrupted.
- Unprocessed positions: Positions that were already selected for processing, but haven’t been processed, because the processing action (e.g. injection) was intentionally or unintentionally interrupted.
Pressing the Restore button will copy the positions to the multiple positions mode where you can review the positions before continuing.
Pressing the  button will permanently delete the restored positions. There will be no way to recover them later.
Focus recording
The focus of the microscope is recorded (if supported) for each selected position, such that it can be restored later during an observation.
| Mode | Focus recording |
|---|---|
| Multiple positions mode | The focus is recorded for each individual position when it is added to the list. |
| Groups mode and Recovery mode | The focus of the points in the group remains unchanged |
| All other modes | The focus is recorded once when continuing to the next step and is applied to all positions. |
Review Positions
Depending on the workflow, the processed positions can be reviewed and saved as a point group once the main workflow procedure (such as injection) is complete. In case the procedure could not be performed on all previously selected positions, it is also possible to save the unprocessed positions.
Edit the list
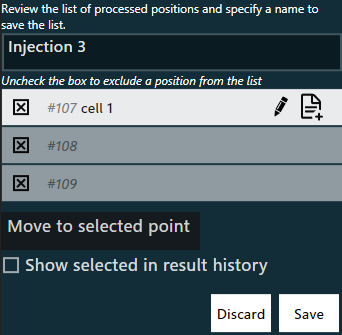
To save the processed positions into a group, enter a unique group name and choose which points to include by (un-)checking the checkbox next to each point.
Note
If the positions were loaded from a previously saved point group during selection, the previously saved group is not modified if you de-select positions here. Instead your selection is saved to a new group using the given name.
Pressing the Move to selected point button will bring the selected point into the center of the view (unless the point is located in a different well than the probe currently is).
Danger
The probe will not be retracted during such a movement. Hence, there is a risk that the probe crashes when moving to a point far away and the surface is uneven or tilted!
Each point can be given a name by pressing the button. This is completely optional but may aid in recognizing points when a preview is not possible.
Note
If a point was loaded from an existing group (by choosing the positions from a point group), changing this point’s name will also be reflected in the other group’s point, because it is effectively the same point.
Adding a note
By clicking the  button on a position in the list, you can also attach a text note to this point. This text note is recorded in the result history similar to text notes.
View results
It is possible to directly see any result data associated with each position by enabling Show selected in result history. Checking this option will open up the result history and filter the results according to the selected position.