Omnium Head
Requisites and considerations
- For any handling of the FluidFM head, we recommend using clean powder-free gloves (never touch the base of the nose with bare hands!).
- Each FluidFM Head pack (CYPR/003866) contains five o-rings for the probe side, three o-rings for the head side and one titanium sealing screw.
- Use only optic-compatible wipes for cleaning (Kim-wipes or similar).
- For any maintenance activity on the nose, the FluidFM head needs to be removed from the system (see Deinstallation of the head).
- Do not immerse the FluidFM head into any cleaning solution.
- When placing back the FluidFM head back to the system, make sure to follow XY-head and Z-height calibration before any other operation.
Deinstallation of the head
- For safety reasons, a probe adaptor must be gripped on the FluidFM Omnium.
- Make sure that ARYA software is closed and that the Omnium control unit is powered off.
- From the back of the FluidFM Omnium, open the incubator to access the head. Move the head to the highest position (z-axis).
- Carefully, take out the pressure tube and the head cable out of the socket by pressing the clips on the sides.
- With a 2mm Allen key, unscrew the 2 screws of the head, while keeping the head with one hand.
- Carefully, pull up the head and remove it from the system.
- Place the head on a flat and clean surface.
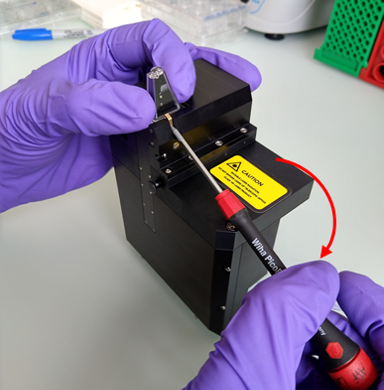
- Using a T1 screwdriver, lock into the golden gripper and release the probe mounted on the head by rotating the screwdriver vertically down. Remove the probe manually.
Remove the o-ring (probe side)
- With a pair of tweezers, remove the o-ring (probe side one) from the nose.
- Carefully and by using tweezers insert a new o-ring in the same position.
Note
Make sure that the replacement o-ring is the one for the probe side.
Exchange sealing screw and o-ring (head side)
- Remove the o-ring (probe side) as stated in the previous section.
- Carefully, with the micro-torque screwdriver, unscrew the sealing screw in the nose.
- With tweezers, remove the now visible second o-ring (head side), located in the opening where the screw was.
- Place the new o-ring (head side) with tweezers.
- With the micro-torque screwdriver, place the new sealing screw and tightening until it clicks (the screw will be tightened until a maximum of 3.5 N/cm).
- Place now a new o-ring (probe side) as stated in the previous section.
Prism cleaning
- With a clean Kim-wipe, dipped into the 2% SDS solution, wipe gently the nose (including the metal part) and the tip of the prism. Do not spray any cleaning solution directly on to the nose.
- With a new clean wipe and fresh milliQ water, wipe the same area. Repeat this step 2-3 times to make sure that all the SDS has been removed.
- With a new clean wipe, clean the same area with isopropanol 70%.
- Install the head back to the system and verify that the prism is clean.