Stage XY
Preparation
General requirements
General installation conditions: for a secure installation of FluidFM Omnium positioning system on the superior unit (e.g. optical microscope) it must be ensured:
- Accessibility is provided
- Sufficient lighting is set up
- The unit is disconnected from the power supply and protected from unexpected switching on
- All adequate safety precautions are fulfilled
- Necessary measures for safety work are taken
Installation of the FluidFM XY
Unpacking of the FluidFM Omnium positioning system
Open transport box and remove packaging.
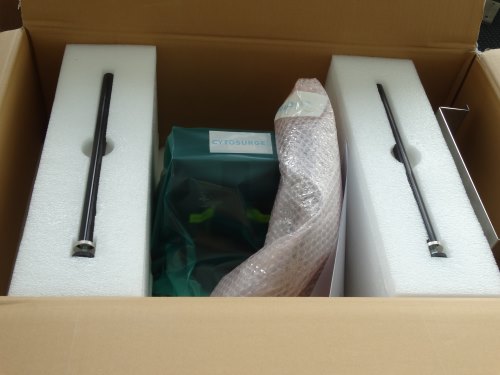
- FluidFM Omnium XYZ positioning system in the transport crate
Lift the FluidFM XYZ positioning system from the crate
- Remove protective foam
- Open packaging foil with the scissors
- Remove packaging foil and put the positioning system on a clean, flat surface of the transport carriage
- Lift the Stage XYZ from the transport crate carefully
The positioning system weighs more than 25 kg.
Before lifting the system manually, the Fluid FM Omnium Z-axis (8.5 kg) must be first disassembled from the FluidFM Omnium XY-axis (16.5 kg) and be taken out separately.
Warning!

Never lift the FluidFM Omnium XY-axis and FluidFM Omnium Z-axis by sheet metal covers! Lift the axis by gripping on structural frame only. Never lift the FluidFM Omnium XY-axis- and FluidFM Omnium Z-axis with the cables! Avoid deformity and mishandling of the cable to prevent cable damage! Damaged cables may cause malfunctions!

- FluidFM XY-stage
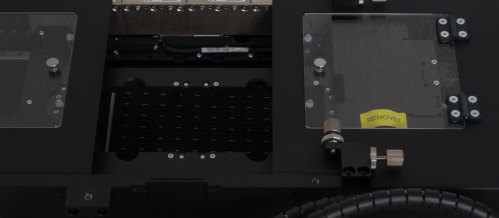
- FluidFM Omnium XY-stage transport safety (fitting screw)
Remove transport safety fitting screw, as showed in the video:
Installation of FluidFM Omnium XY
Mounting position of the FluidFM Omnium XY-stage in the superior unit (e.g. optical microscope) is horizontal.
Requirements for installation: interface for installation on the superior unit:
Stage XY is mounted with the screws onto the microscope. Mounting surface must maintain a flatness minimum 15 µm.
Depending on the microscope’s type must be used spacers or distance blocks. The assembly of FluidFM Omnium XY-axis onto the Zeiss Observer and Olympus microscope is described below. The Nikon and Leica are not described in this manual.
It must be ensured that superior unit is disconnected from the main line during the XY-Stage installation. To ensure proper grounding of the FluidFM Omnium XY-stage together with superior unit.
The support bolts stabilize the XYZ-System on the microscope.
Assembling and adjusting of the support bolts:
- Coarse setting of the height: install the support bolts and set their height by loosing of the clamp holders
- Precise setting of the height: screw down the bolts till they slightly place on the baseplate
- Counter the support bolts with ring nuts as showed in the video:
Caution!
Too high bolts tension may negatively impact geometric accuracy of the XY-Stage.
Olympus IX83 microscope
- Spacers or distance blocks are necessary for FluidFM Omnium XY-axis mounting onto Olympus microscope
- First fasten the distance blocks on the microscope
- Set up XY-Stage carefully in twos onto microscope
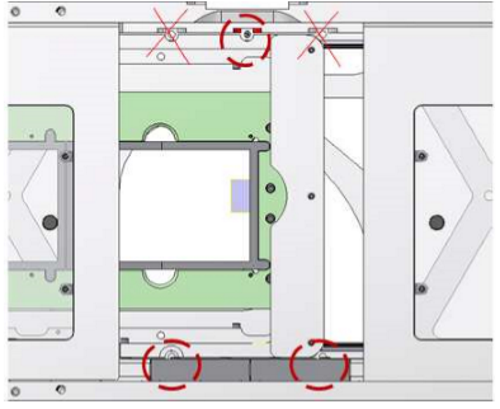
- Slide X-axis to left stop position. Special milling grooves in X-sledge provides an access to the screw holes
- Mount and tighten the 3xM4x12 fixing screws Torque value 310 Ncm Access to screws (areas highlighted with circle) is only possible in certain X-axis positions ** Insert all three screws first. Then start tightening on the side with the two holes
Objectives Collision Danger
When operating the system with the Olympus IX83 microscope, always set the objective’s Escape Length to 9mm and the maximum z-focus travel range to 9.5mm to avoid collision of the objectives with the stage

- View from below: distance blocks for Olympus microscope
- View from above: tightening with 3xM4X12 screws
Zeiss Observer microscope
- No spacers or distance blocks are used by the mounting the XY-axis onto Zeiss microscope
- Set up carefully in twos XY-Stage onto the microscope
- Slide X-axis to left stop position. Milling grooves in X-sledge provides an access to the screw holes
- X-sledge must be placed in the appropriate position
- Mount and tighten the 3xM4x16 fixing screws (torque value 310 Ncm)
- Access to screws (areas highlighted with circle) can be possible in certain X-axis positions only

- Interface for Zeiss Observer. Fastening with 3xM4x16 screws
(Vorderseite XY-Stage means forefront of the XY stage):